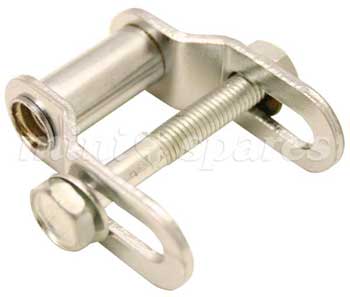
BG5101MS STEERING COLUMN ADJUSTER BRACKET – Fitting instructions
This bracket is designed to adjust the rake/height of the steering column and wheel. Incorrect fitment will cause premature wear and damage to steering column and rack, so the following MUST be adhered to.
1. Remove column to mounting bracket shear bolt. If the bolt head has actually been sheared off, this is easily accomplished using a small centre or pin punch, working around the edge of the cone-shaped bolt head that is left. Driving it in an anti-clockwise direction. The securing nut on the other end is located in a shaped slot in the main bracket.
2. Fit the column adjuster bracket into position – the ‘legs’ either side on the column - mounted bracket, and the ‘waisted’ section between the main bracket legs. Using a new bolt (shear bolt not necessary – a 5/16”UNF x 2” will be fine), secure the adjuster to the main bracket. The slide the new column bracket to adjuster bracket into place and fit the nut loosely.
3. Pull back floor carpet from the toe-board area. Identify two pairs of vertically positioned ½”AF nuts, a pair on each side of driver and passenger toe-boards. Slacken these off to allow the rack body to rotate when re-positioning the column. Failure to do this can cause steering failure.
4. Lower column to desired position, tighten column bracket to adjuster bracket bolt/nut, then re-tighten rack to toe-board nuts (10-12lb/ft). Do not over-tighten, as this will deform the rack to body positioning mounting.
Download a printable PDF of this fitting instruction here
 BG5101MS.pdf
see BG5101MS details